
一、网络拓扑与物理连接
1.1 物理连接架构
光猫
├── WAN口 → 路由器WAN口(eth4)  # PPPoE拨号(上网业务)
└── IPTV口 → 路由器eth0        # 组播流传输(IPTV业务)

路由器
├── eth0 → 连接光猫IPTV口(纯组播流)
├── eth4 → 连接光猫WAN口(PPPoE拨号)
├── eth1-3 → LAN口(内网设备)
└── WiFi → 无线客户端
1.2 数据流向示意图
graph TD
    A[运营商组播源] --> B(光猫IPTV口)
    B --> C[路由器eth0]
    C --> D[udpxy服务]
    D --> E[HTTP单播流]
    E --> F[WiFi/LAN客户端]

    G[互联网] --> H(光猫WAN口)
    H --> I[路由器eth4]
    I --> J[PPPoE拨号]
    J --> F

    style C fill:#e1f5fe
    style D fill:#c8e6c9
二、路由器基础配置
2.1 网络接口配置
# 配置LAN口(内网)
uci set network.lan=interface
uci set network.lan.ifname='eth1 eth2 eth3'
uci set network.lan.proto='static'
uci set network.lan.ipaddr='192.168.68.1'
uci set network.lan.netmask='255.255.255.0'
uci set network.lan.gateway=''
uci set network.lan.dns=''

# 配置WAN口(PPPoE拨号)
uci set network.wan=interface
uci set network.wan.ifname='eth4'
uci set network.wan.proto='pppoe'
uci set network.wan.username='你的宽带账号'
uci set network.wan.password='你的宽带密码'

# 配置IPTV口(静态IP)
uci set network.iptv=interface
uci set network.iptv.ifname='eth0'
uci set network.iptv.proto='static'
uci set network.iptv.ipaddr='运营商提供的IP'      # 运营商提供的IP
uci set network.iptv.netmask='255.255.128.0'  # 运营商提供的掩码
uci set network.iptv.gateway='10.121.128.1'      # 光猫IPTV口IP
uci set network.iptv.dns='221.179.155.161'   # 运营商DNS
uci set network.iptv.metric='100'             # 路由优先级

uci commit network
/etc/init.d/network restart
2.2 防火墙配置
# 放行IPTV接口流量
uci add firewall rule
uci set firewall.@rule[-1].name='Allow-IPTV-In'
uci set firewall.@rule[-1].src='iptv'
uci set firewall.@rule[-1].proto='all'
uci set firewall.@rule[-1].target='ACCEPT'

# 放行组播流转发
uci add firewall rule
uci set firewall.@rule[-1].name='Allow-Multicast'
uci set firewall.@rule[-1].src='iptv'
uci set firewall.@rule[-1].dest='lan'
uci set firewall.@rule[-1].proto='udp'
uci set firewall.@rule[-1].dest_ip='224.0.0.0/4'
uci set firewall.@rule[-1].target='ACCEPT'

# 放行udpxy HTTP服务
uci add firewall rule
uci set firewall.@rule[-1].name='Allow-Udpxy-HTTP'
uci set firewall.@rule[-1].src='lan'
uci set firewall.@rule[-1].proto='tcp'
uci set firewall.@rule[-1].dest_port='4022'
uci set firewall.@rule[-1].target='ACCEPT'

uci commit firewall
/etc/init.d/firewall restart
三、udpxy服务配置
3.1 安装udpxy
# 更新软件包列表
opkg update

# 安装udpxy
opkg install udpxy

# 如安装失败,尝试强制安装
opkg install --force-depends udpxy
3.2 配置udpxy服务
# 基础配置
uci set udpxy.@udpxy[0].source='eth0'          # 组播源接口
uci set udpxy.@udpxy[0].bind='192.168.68.1'   # 服务监听IP
uci set udpxy.@udpxy[0].port='4022'           # 服务端口
uci set udpxy.@udpxy[0].buffer_size='262144'  # 缓冲区大小(256KB)
uci set udpxy.@udpxy[0].max_clients='20'      # 最大客户端数
uci set udpxy.@udpxy[0].disabled='0'          # 启用服务

uci commit udpxy
3.3 创建服务管理脚本
cat > /etc/init.d/udpxy << 'EOF'
#!/bin/sh /etc/rc.common

USE_PROCD=1
START=50
STOP=89

start_service() {
    procd_open_instance
    procd_set_param command /usr/bin/udpxy \
        -a 192.168.68.1 \
        -p 4022 \
        -m eth0 \
        -c 20 \
        -l /var/log/udpxy.log \
        -B \
        -v
    procd_set_param respawn
    procd_set_param stdout 1
    procd_set_param stderr 1
    procd_close_instance
}

stop_service() {
    procd_kill
    killall -9 udpxy 2>/dev/null
}

status() {
    if pgrep -x "udpxy" >/dev/null; then
        echo "udpxy is running"
    else
        echo "udpxy is stopped"
    fi
}
EOF

chmod +x /etc/init.d/udpxy
/etc/init.d/udpxy enable
/etc/init.d/udpxy start
四、光猫侧配置要求
4.1 光猫关键设置
- 登录光猫后台(通常
http://192.168.1.1) - IPTV口设置:
- 工作模式:桥接模式
- DHCP服务:关闭
- IGMP Proxy:启用
- 快速离开:启用
- 网络绑定:
- IPTV口绑定到正确的VLAN(如有要求)
- 确保IPTV口启用组播转发
4.2 运营商特定配置
| 运营商 | IP地址段 | 网关 | DNS | 特殊要求 |
|---|---|---|---|---|
| 中国移动 | 不提供 | 不提供 | 不提供 | VLAN1010 |
| 中国电信 | 不提供 | 不提供 | 不提供 | 不提供 |
| 中国联通 | 不提供 | 不提供 | 不提供 | 不提供 |
五、验证与测试
5.1 基础连通性测试
# 检查物理链路
ethtool eth0 | grep "Link detected"
# 预期输出:Link detected: yes

# 检查IP配置
ip addr show eth0 | grep "inet"
# 预期输出:inet 10.1.1.100/24 brd 10.1.1.255 scope global eth0

# 测试网关连通性
ping -c 3 10.1.1.1
# 预期:3 packets transmitted, 3 received
5.2 组播流验证
# 监听组播流量(等待10秒)
timeout 10 tcpdump -i eth0 -nn 'dst 224.0.0.0/4' -c 3 -vv成功标志:
listening on eth0...
IP 10.1.1.1.1234 > 239.1.1.1.5140: UDP, length 1316
IP 10.1.1.1.1234 > 239.1.1.2.5140: UDP, length 1316
5.3 udpxy服务测试
# 检查服务状态
/etc/init.d/udpxy status
# 预期:udpxy is running

# 检查端口监听
netstat -tuln | grep 4022
# 预期:tcp 0 0 192.168.68.1:4022 0.0.0.0:* LISTEN

# 测试HTTP服务
curl -I "http://192.168.68.1:4022/status"
# 预期:HTTP/1.1 200 OK
5.4 播放测试
播放地址格式:
http://192.168.68.1:4022/udp/组播IP:端口示例:
- CCTV-1高清:
http://192.168.68.1:4022/udp/239.1.1.1:5140 - 地方台:
http://192.168.68.1:4022/udp/239.1.1.2:5140
支持播放器:
- VLC媒体播放器
- Kodi + PVR IPTV Simple Client
- 手机APP:VLC、IPTV Smarters等
六、故障排查指南
6.1 分层诊断法
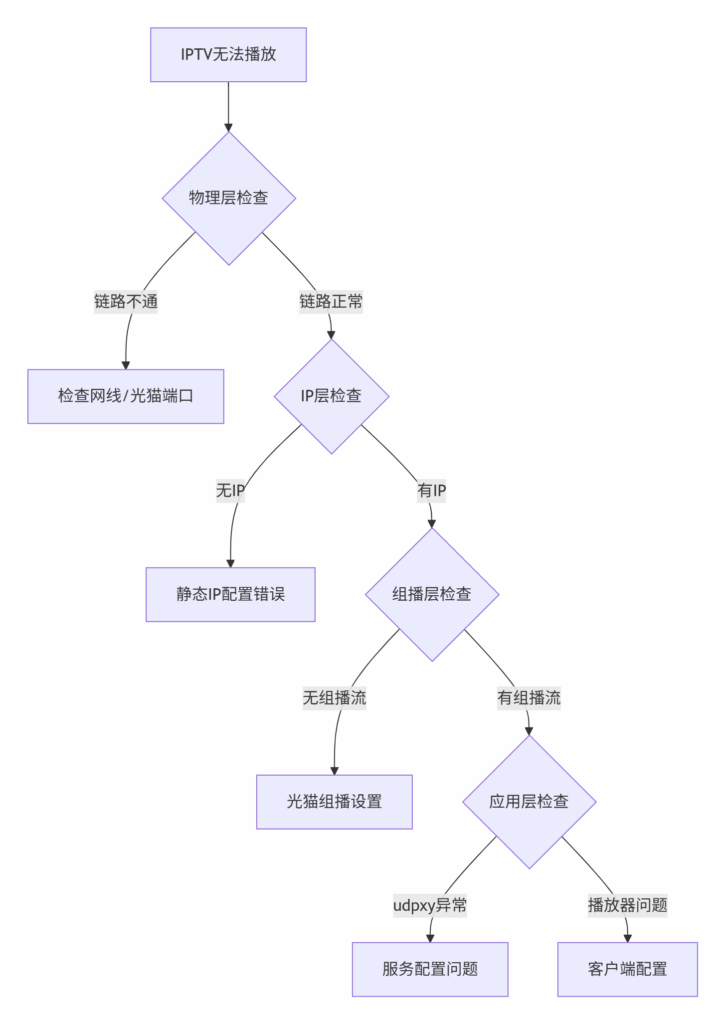
graph TD
    A[IPTV无法播放] --> B{物理层检查}
    B -->|链路不通| C[检查网线/光猫端口]
    B -->|链路正常| D{IP层检查}
    D -->|无IP| E[静态IP配置错误]
    D -->|有IP| F{组播层检查}
    F -->|无组播流| G[光猫组播设置]
    F -->|有组播流| H{应用层检查}
    H -->|udpxy异常| I[服务配置问题]
    H -->|播放器问题| J[客户端配置]
6.2 常见问题解决方案
问题1:无组播流量
# 诊断命令
tcpdump -i eth0 -nn 'dst 224.0.0.0/4' -c 3 -vv

# 解决方案
1. 检查光猫IGMP设置
2. 确认光猫IPTV口启用组播
3. 联系运营商开通组播权限问题2:udpxy无法启动
# 诊断命令
logread | grep udpxy
netstat -tuln | grep 4022

# 解决方案
1. 检查端口冲突:kill占用4022端口的进程
2. 检查权限:chmod +x /usr/bin/udpxy
3. 手动测试:udpxy -a 192.168.68.1 -p 4022 -m eth0 -v -f问题3:播放卡顿
# 优化配置
uci set udpxy.@udpxy[0].buffer_size='524288'  # 增大缓冲区
uci set udpxy.@udpxy[0].max_clients='10'      # 减少客户端数
uci commit udpxy
/etc/init.d/udpxy restart问题4:多设备无法同时播放
# 诊断命令
ps | grep udpxy | wc -l  # 查看客户端连接数

# 解决方案
1. 增大最大客户端数:uci set udpxy.@udpxy[0].max_clients='20'
2. 优化网络:确保WiFi信号强度
3. 考虑分流:使用多个udpxy实例不同端口
6.3 一键诊断脚本
#!/bin/bash
echo "=== IPTV全链路诊断 ==="

echo -e "\n[1] 物理层检查:"
ethtool eth0 | grep "Link detected"

echo -e "\n[2] IP层检查:"
ip addr show eth0 | grep "inet"
ping -c 2 10.1.1.1

echo -e "\n[3] 组播层检查:"
timeout 5 tcpdump -i eth0 -nn 'dst 224.0.0.0/4' -c 1 -vv &

echo -e "\n[4] 服务层检查:"
/etc/init.d/udpxy status
netstat -tuln | grep 4022
curl -s -o /dev/null -w "%{http_code}" http://192.168.68.1:4022/status

echo -e "\n=== 诊断完成 ==="
七、性能优化建议
7.1 网络优化
# 增大内核网络缓冲区
echo 'net.core.rmem_max=262144' >> /etc/sysctl.conf
echo 'net.core.wmem_max=262144' >> /etc/sysctl.conf
sysctl -p

# 优化交换机设置(如支持)
swconfig dev switch0 set enable_vlan 1
7.2 udpxy优化
# 增大缓冲区防止卡顿
uci set udpxy.@udpxy[0].buffer_size='524288'  # 512KB
uci set udpxy.@udpxy[0].max_clients='15'      # 根据设备数调整

# 启用详细日志(调试后关闭)
uci set udpxy.@udpxy[0].verbose='1'
uci commit udpxy
7.3 自动维护脚本
# 创建日志轮转
cat > /etc/logrotate.d/udpxy << 'EOF'
/var/log/udpxy.log {
    daily
    rotate 7
    missingok
    notifempty
    compress
    delaycompress
    postrotate
        killall -HUP udpxy 2>/dev/null || true
    endscript
}
EOF

# 创建定时重启(可选)
echo "0 4 * * * /etc/init.d/udpxy restart" >> /etc/crontabs/root
/etc/init.d/cron restart
八、进阶配置(可选)
8.1 多VLAN配置(如运营商要求)
# 配置业务VLAN
uci add network switch_vlan
uci set network.@switch_vlan[1].device='switch0'
uci set network.@switch_vlan[1].vlan='1010'
uci set network.@switch_vlan[1].ports='1t 5t'

# 使用VLAN子接口
uci set network.iptv.ifname='eth0.1010'
uci commit network
8.2 负载均衡方案
# 多个udpxy实例(不同端口)
uci set udpxy.iptv2=udpxy
uci set udpxy.iptv2.source='eth0'
uci set udpxy.iptv2.bind='192.168.68.1'
uci set udpxy.iptv2.port='4023'
uci set udpxy.iptv2.disabled='0'
九、总结
本方案提供了从 物理连接 到 应用服务 的完整IPTV组播解决方案,重点解决了:
- ✅ 正确的网络拓扑 - 光猫与路由器正确连接
- ✅ 精简的配置方案 - 无需复杂VLAN配置
- ✅ 稳定的服务管理 - procd托管确保服务可靠性
- ✅ 完整的监控体系 - 分层诊断快速定位问题
- ✅ 性能优化建议 - 保障多设备流畅播放
核心优势:
- 配置简单,维护方便
- 兼容主流运营商
- 支持多设备同时观看
- 具备完整的故障排查体系
通过此方案,您可以在OpenWRT路由器上稳定实现IPTV组播流转单播,让家中所有设备都能观看直播电视。

Comments NOTHING